Friday, August 24, 2012

Cute As A Button Baby Shower

Happy Friday!

We had the joy of throwing a baby shower for Ashley Knox of It Rocks To Be A Knox.


This is her second baby but her first girl! Carly Rose Knox will join the world in just three short weeks.

Here's the adorable Knox family:

Photo courtesy of Knox Studio Photography

We had so much with the details of this "Cute As A Button" shower for Carly Rose and Mama Knox.
Here are the pictures.
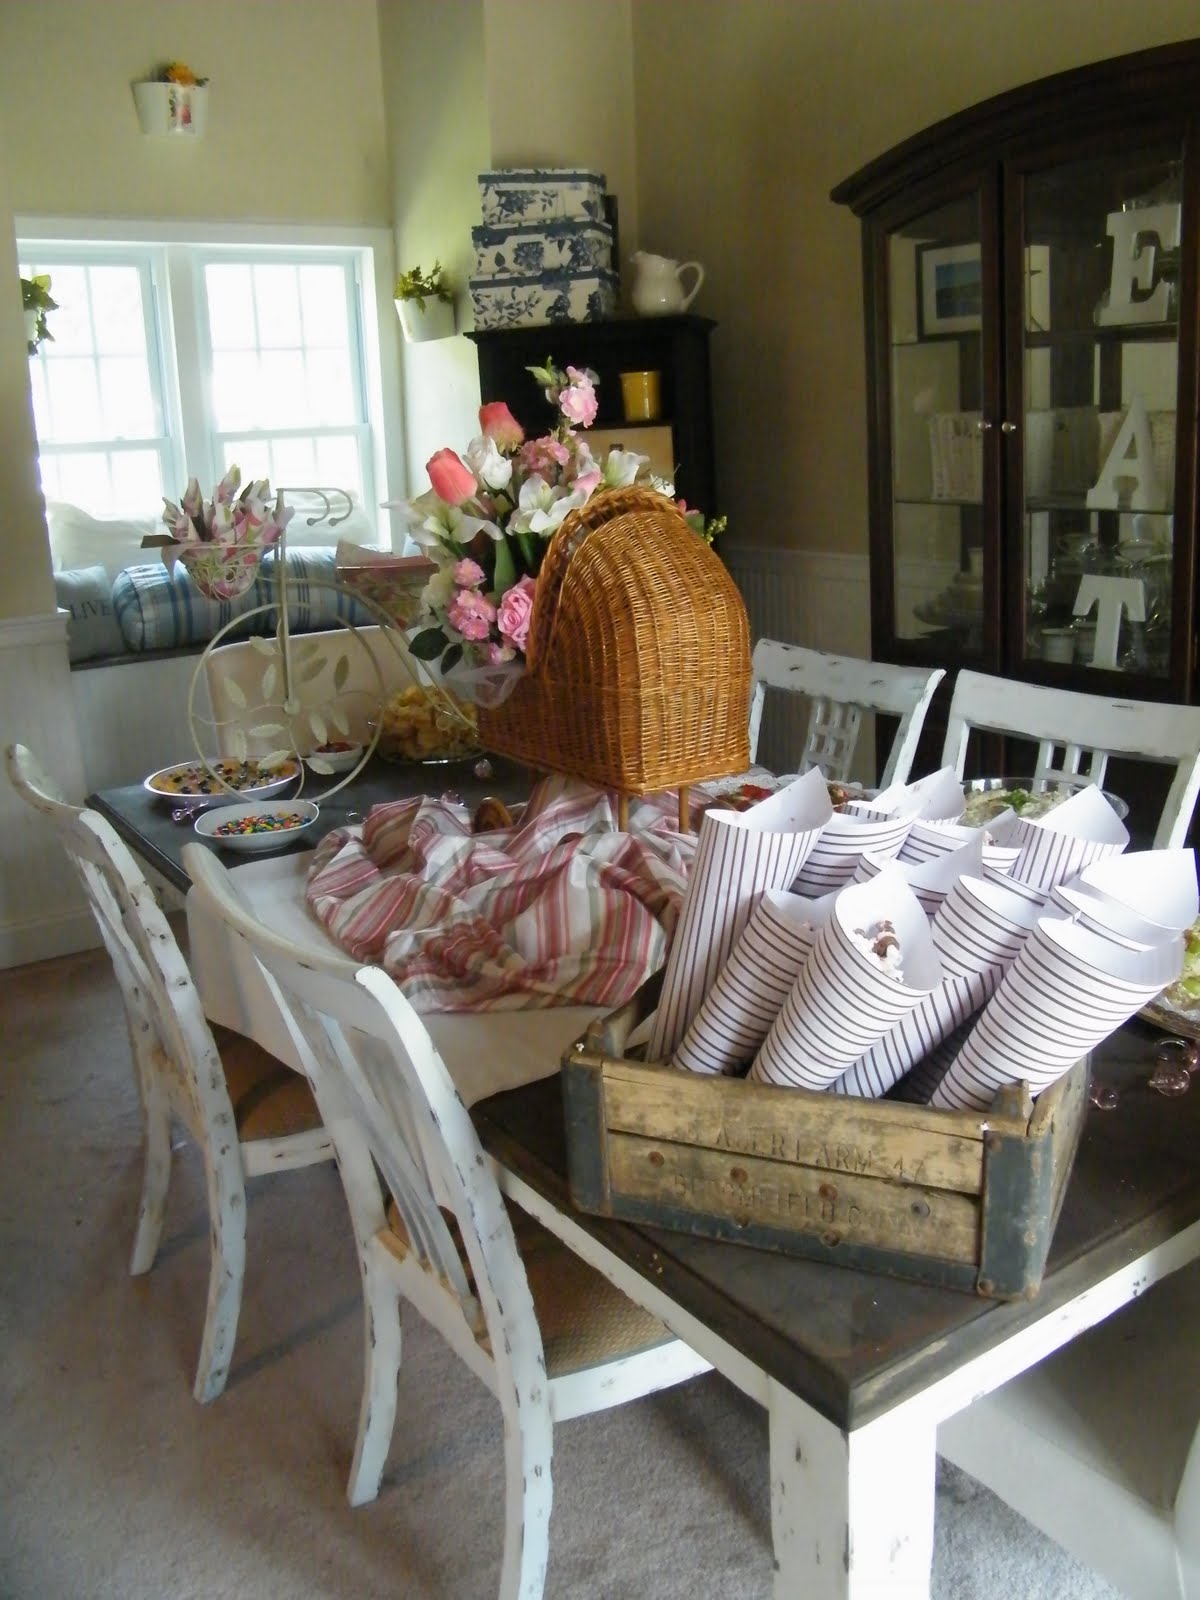
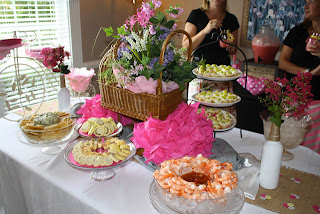
Dessert display

An antique tea cart held the mason jars


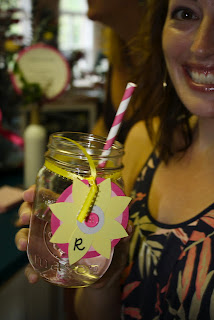
The mason jars had a pink or gray straw from The Party Fairy and a handmade flower tag made by us. (Take notice of the button center)
Tags are great because they offer a spot for guests to write their name.


A "CUTE AS A BUTTON" banner that we made along with tissue paper poms


The spread


For the cupcakes display, we used an antique two tiered table that we picked up during an antique shopping spree.


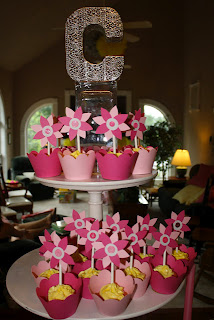
The cupcakes had a flower that matched the mason jar tags
(cupcake flavor: Strawberry with a whipped chocolate ganache center) 

And last but not least, guests were sent home with semi-homemade cookies in the shape of a button

Next week, we'll break down the details and offer a few tutorials so you can use these ideas for your next party.

We hope you have a great weekend!

Thursday, August 23, 2012

DIY Hand Stamped Cupcake Toppers

Happy Thursday! 

We hope you are having a great day!
Yesterday we shared our neat nesting box cupcake display that anyone can do.

If you look a little closer, you'll see the handmade, hand stamped cupcake topper tags that we made.
We wanted something simple because with 120 cupcakes, we feared it could get very busy if we weren't careful.  We combed the internet for inspiration and came across these images...

Photo courtesy of Rebel Diamond Events

Photo courtesy of Go Against the Grain etsy shop

and we knew that we could make them with ease instead of purchasing them (we love when a little of our DIY action can save money for our brides.)


So how did we get this look?
Easy!

We used our Cricut to cut out 120 tags (but if you don't have a Cricut, don't worry. You can buy similar tags at any office supply store or in the Martha Stewart Wedding line at Michael's.)

Then we grabbed our ink pad and stamps and we got to stamping. 


An hour later we had 60 tags that said "i do" and 60 that had a simple heart. 
Once the ink dried, we attached a thin red bow and a toothpick.
We loved that each one was just a little different because they were hand stamped. 
We think they were the perfect simple touch to our display. 
If you want this look but aren't up for a DIY project, contact us for pricing.  We'd be happy to make them and ship anywhere in the United States. 

Tomorrow, we'll give you the yummy whipped chocolate ganache recipe that we used to fill these cupcakes. 

Wednesday, August 22, 2012

DIY Cupcake Stand

Hi!

Today we have a project that almost anyone can do and it involves a yummy treat:  CUPCAKES!

Cupcakes have become a popular trend for weddings and parties and they can be the perfect ending to any meal for many reasons: 

  1. They fit nicely in the palm of your hand 
  2. Unlike a cake, they don't have to be cut (which can avoid expensive cake cutting fees, extra plates and forks) 
  3. And people can sample an array of flavors without totally pigging out. 

But, it can be a difficult task to make your cupcake display appear as classy and eye-catching as the traditional wedding cake, that often resembles a modern-day work of art. 

Recently, we were tasked with the challenge of making and displaying 120 cupcakes for a very budget-conscious bride.  

Here's the final display:

So here's how we got the look:
We decided to think outside of the box... a nesting box that is.  

We visited our local TJ Maxx and Tuesday Morning stores, where we sought out the perfect coordinating nesting boxes.  Nesting boxes are great dividers/shelves because they naturally form a tier, much like a wedding cake and they are sturdy enough to handle the weight of heavy wood. 

Then we headed to Home Depot to get a couple sheets of MDF wood. We had a friend cut them for us, but don't fret if you don't have the tools or skills of a carpenter.  Many people don't realize that Home Depot and Lowe's will make cuts free-of-charge, as long as they are straight and easy cuts.  Just come prepared with your measurements.  (We did a trial run with poster board)

Once the wood was cut, we primed, painted and polyurethaned the wood and it was ready to go!  

It was so easy, and now it can be reused for years.  If our clients want to use our makeshift cupcake display, they can switch out the nesting boxes for ones that coordinate with their wedding/party colors. In fact, we plan to use it on September 1st for a Vegas/Casino themed bridal shower (check back for those pictures!) 


Tomorrow, we'll give you a quick tutorial on the cupcake toppers that we made by hand.

 We leave you with a picture of the happy couple's first dance.

In the meantime, be sure to check us out on our Facebook page.


Tuesday, August 21, 2012

Backyard BBQ: 30th Birthday Bash

Welcome to our backyard BBQ!

We planned this party for Brandon, Heather's husband.  It was for his 30th birthday.

Originally, we planned for an outdoor birthday bash until the heat for the day hit record temps. 
We were thanking our lucky stars that we made the choice to bring the celebration inside because halfway through the party, they skies opened up and it poured rain. 
Unfortunately, we had to give up a few of our ideas, such as a s'more station, but everyone still had a great time. 

Here are plenty of pictures so you can see the details that Style Made Simple put together:

When guests arrived, they were greeted by a hay bail display filled to the brim with beverages.

If a bottled drink didn't quench the guest's thirst, we had other choices available.
If you haven't figured it out yet, we love the combination of a mason jar, vintage paper straw and a handmade tag.

We had lots of little details that added to backyard BBQ feel:

Utensils wrapped with an added tag
Potato salad filled these mini mason jars

 
Centerpieces arranged by us


 Then there was the food:
We had slow-smoked pulled pork 
(prepared by the birthday boy- see the picture above),
chips in handmade paper cones


 and a sweet shoppe stocked with homemade treats:


As the party came to a close, guest's were sent home with a mini homemade apple pie. 


 Here's a tip: 
Plan your party colors around the holiday that is near your event date.
This party was three weeks after the 4th of July, so we were able to find red, white and blue clearance with ease.

Have a wonderful day!


Monday, August 20, 2012

Sugar, Spice and Everything Nice: Baby shower

Happy Monday!

If you got your Monday off to a bad start, here's a little something that will surly make you smile.  
We had the joy of throwing a baby shower for a girl that struggled for years with infertility.  It's truly amazing to be involved in such a touching event.    

So here's the scoop:

Theme: Sugar and Spice & Everything Nice 
  
Guests were welcomed with a drink bar stocked with iced tea, lemonade and a peach punch


  and guests drank from mason jars with hard plastic straws from Party City.
 The jars were decorated with jute twine and tags made by yours truly.  
The wording on the tags: "Baby, you're the milk to my cookies."

An "OH BABY" burlap banner hung above the drink bar.
We made the banner out of burlap and paint that we already had from previous projects. 
Gotta' love free!

Up next, we had an appetizer bar chalked full of fruit, cheese and a chocolate fountain.


We love signs to add that special touch.  
The wording:  "Enjoy the food for a treat...Take it to the fountain to make it sweet)

Then we had more food, most of which was catered.  


The centerpiece is an antique baby doll carriage that we picked up on one of our antique shopping sprees. 
 
(You've probably noticed the faux flowers.  While we love freshly picked flowers from our garden, we had to go with silk flowers for this party.  Mom-to-be is allergic to flowers, so we had to be "faux sure" we didn't have a flower induced asthma attack during our celebration)

We wrapped the silverware in napkins and dressed it up with ribbon and another handmade tag.
The wording:  "Grab a fork... eatin' for two."

Plates, napkins and silverware were displayed in a bike shaped planter that we snammed for 1/2 off at Michael's five years ago.  
This bike has been worth the money! We use it for every party we throw!
One of the few dishes not catered was the chocolate covered popcorn.
We drizzled pink and brown chocolate on microwaved popcorn and served it up in handmade paper cones and a vintage milk crate.
Once the guests made the loop around the table they looked to their left where where we set-up a cookie and milk bar.
All the cookies were homemade...
and we went old school with vintage-inspired glass milk jugs from Wal-mart, filled with regular, strawberry and chocolate milk. 
I couldn't believe it when I laid eyes on  the vintage jugs...
And for less than $5 bucks each (at Walmart). 
We carried the "Baby, you're the milk to my cookies" theme to the Cookie Bar sign.

 The fun didn't stop with the cookies!
You didn't think we forgot the cake, did you?  
We had raspberry filled cupcakes displayed on our vintage whisky barrel.

We made a "BABY" sign with white wooden letters from Michael's, a hot glue gun and pink and white polka-dot ribbon.
And we added another sign that we whipped up in word.
The wording:  "Oh Baby!  Mama's got a little cookie baking in the oven!")

And while we aren't huge fans of the shower games, we did play one game;  "Guess the Spices" to go along with our theme.

As things wrapped up, guests were sent off with a cookie kit.
We assembled the ingredients in 1 quart mason jars and attached a tag with cooking instructions along with a cookie cutter.

Hope you had as much fun checking out my party as we did throwing the party!

Thanks for stopping by.